By Joseph Blaes, DDS
The starting point of all dental treatment is to listen to your patient’s chief complaints and their expectations. By having a good understanding of your patient’s desires, you will be able to present treatment options that will provide the desired results.
Many years ago, communication in my dental practice was a major problem. I was a poor communicator with the people who worked for me and with my patients. I decided that we all needed to learn to communicate with ourselves first, so we began by learning the Applications of Neuro-Linguistic Programing in Health-Centered Dentistry. We mastered these applications and in the six-month process became a Team. We then quickly applied these principles to our communication with our patients. Basically, we had learned how to Listen and Ask Questions.
One of the systems we developed together was the New Patient Interview. No more sliding glass windows or clipboards with papers to fill out. In Stephen Covey’s The 7 Habits of Highly Effective People, Habit 5 is “Seek first to understand, then to be understood.” Using the principles of this Habit, the assistant’s goal is to find out all that she can about her patient’s past dental experiences and what their expectations were. In the process, she has begun to establish a trust relationship with the new patient.
I also found that I was able to visualize how a patient's teeth were going to look when I was finished changing their smile. I could also visualize how I was going to prep the teeth in order to make that change. This allowed me to speak to the patient about their treatment with confidence. Let’s examine a specific example.
CASE STUDY
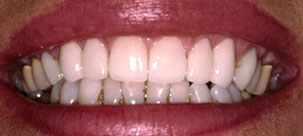
A 40-year-old female patient enters the practice as a new patient. During her new patient interview, her chief complaint is her gummy smile and the color of her teeth. She also feels that her two upper front teeth are “pushed back” and she would like her teeth to be whiter.
Upon examination, the patient’s occlusion, periodontal health, and joints are all within normal limits. Both central incisors are lingually inclined and show some incisal wear. The lateral incisors are in their proper positions. The cuspids are rotated slightly. The color of all the anterior teeth including the bicuspids is off.
After “sounding for bone” according to the research by Dr. Stephen Chu, it is established that the gingival tissue can be surgically recontoured.
After reviewing the digital radiographs and the occlusion, it is determined that the upper anterior teeth can be restored with porcelain veneers which will improve the position of the teeth and solve the color problem. The upper right first and second bicuspids both have composite restorations that need to be replaced due to decay and marginal leakage. These teeth would be restored with inlay porcelain veneers. An upper impression is made and sent to the dental lab for a wax-up.
At the next appointment, the diagnosis and recommended treatment are thoroughly discussed with the patient and she is able to view the wax-up. She is excited and agrees to proceed with the outlined treatment. An appointment is made to begin the restorative treatment.
The patient arrives on time and is seated and made comfortable with blankets, protective glasses, lower back support, a long protective cover, lip balm, and headphones. The patient is lightly sedated with nitrous oxide for relaxation during a long procedure.
One of the problems with anterior restorations is delivering anesthetic painlessly. I have adapted an anesthesia technique developed by Dr. Larry Rosenthal which is almost painless. The assistant places a topical anesthetic gel and we give it time to work. Then, using an extremely sharp small gauge needle (Septoject Evolution by Septodont), we raise the upper lip and stretch the tissue. We barely penetrate the tissue in the sulcus over the first tooth and then slowly inject anesthetic until a weal is raised. Next, we remove the needle and place a finger on the weal and push it into the sulcus and medially or distally toward the next tooth. Proceeding to the next tooth, we do the same thing. This is done to the nine teeth we will be restoring. Then the first tooth is injected with anesthetic to the apex of the tooth as well as the remaining teeth. The patient will have great anesthesia without experiencing any pain.
Using an electrosurgical unit with a very fine needle (the Colorado MicroDissection Needle from Stryker), the gingival tissue is removed with more control and precision while establishing the new contour.
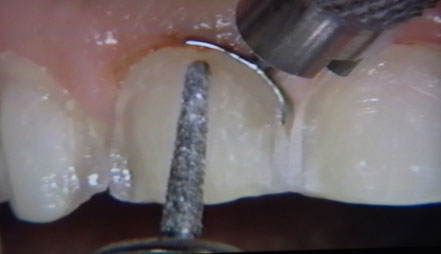
Veneers are prepped with a round-ended tapering disposable diamond in a Bien-Air EVO.15 electric handpiece that provides constant power, low noise, and with no stalling so that teeth are cut in less time. The Bien-Air electric finishes the tooth with a more precise and smoother prep. Recent research has shown that the water spray can be turned off on the Bien Air Electric Handpiece to eliminate the aerosol. You can actually prep dry for a maximum of 20 seconds, I then lift the bur away from the prep for 10 seconds, then I continue prepping for another 20 seconds. This sequence will not damage the pulpal tissues. The head of the Bien-Air Electric handpiece will not get hot, because of the patented CoolTouch+™ heat arresting technology. The preps are so precise that the finished veneers actually snap into place so there is no doubt that they have seated properly.
The best way to control tissue bleeding is not to avoid cutting the tissue. Use a Zekrya instrument from DMG America to retract and protect the tissue when setting the subgingival veneer margin. Strip all interproximal margins so they are sharp. Great impressions with no bubbles. Bite registration with vertical and horizontal planes, or using a scanner for a digital impression.
Aesthetic Provisionals: a matrix was made before the appointment using the Matrix Button from Advantage Dental Products, Inc. The button was softened in hot water and then formed on the wax upped model. The softened button will not melt the wax on the model. The result is a hard, plastic matrix with precise detail from the wax-up that is used for making the Provisionals.
Fill the matrix with LuxaTemp-Ultra from DMG America, keeping the mixing tip in the flowable material as you dispense it. The Matrix is seated over the prepared teeth and left to set up for five minutes. The hard, plastic matrix will only seat in the correct position. I do not remove the Provisionals/temporaries from the teeth; I leave the Provisionals in place using the undercuts to secure them in place. I gently tease with a rocking motion and only remove the Matrix. All excess bis-acyl material is removed and the margins are trimmed with SS White Safe End Series Carbide Burs and I use the SE4-20 or SE6-20 bladed finishing burs that will not cut the tissue. The Provisionals are not removed and are secured by material that has come through the contacts on the lingual. The bite is checked and any high spots are adjusted. These Esthetic Provisionals come very close to an exact replica of your final restorations. This gives your patient an opportunity to check out size, shape, length, speech, and overall looks. Another appointment is scheduled with the patient in a few days for feedback from the patient. Changes are made for the patient and when they are satisfied, take an impression to send to the lab to give them the critical tooth shape and length.
All of this requires an extremely close relationship with an experienced esthetic ceramist. Porcelain veneers are an art form and we are very reliant on our ceramist to create the real esthetics that we wish to achieve and that our patients desire. The need for an excellent esthetic ceramist cannot be understated. Any dentist that wants to place porcelain veneers needs to research and develop a great relationship with an artistic ceramist if they want to have patients rave about their new smiles.
After the veneers have arrived, the patient is anesthetized and the Provisionals are carefully removed by cutting them apart. The veneers are tried on and checked for proper seating. The bicuspids are cemented first using a self-curing resin cement. The excess cement is cleaned and the bite is checked. The veneers will be cemented with a light-cured cement. They will be cured with two curing lights from the facial and the lingual.
Excess cement is cleaned and the bite is checked. Any adjustments will be made with fine diamonds and then polished with the Brasseler Diolite System. Be certain that any porcelain that was adjusted is well polished since the patient’s tongue will quickly find any areas that were missed.
Celebration.
The patient is asked to stand in front of a wall-mounted mirror to have her or his first look. We have pre-arranged to have as many of the Team who are available to join the celebration of a new smile with a lot of “OH’s” and “AH’s.” This is what makes dentistry rewarding and fun.
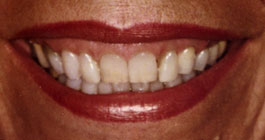
Patient Before

Sounding for bone
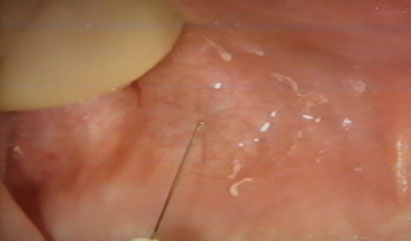
Painless injection
Electrosurgery with the Colorado MicroDissection Needle from Stryker
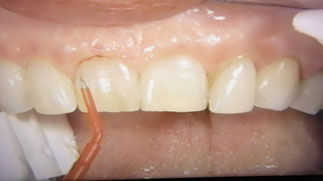
Protect gingival with the Zekrya
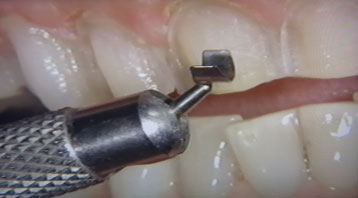
Precision prepping with a Bien Air Electric Handpiece
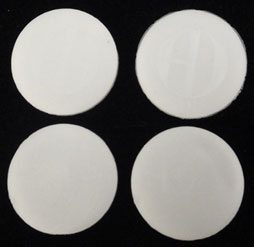
Matrix Button from Advantage Dental Products, Inc. 300
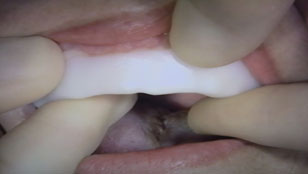
Matrix Button Stent making Provisionals
New smile with beautiful veneers